How to access Parental Controls
Here is a look at how to access Parental Controls on the Cisco DPC3848V modem.
- In a web browser, enter the modem IP address (192.168.0.1 is default)
- Enter your username and password:
- Username: cusadmin
- Password: Serial Number of your modem (white sticker on your modem)
- If you have changed your password, please use the new password you selected.
- Click on Access Restrictions along the top menu or Parental Control from the quick links icons

- Select the appropriate tab for your needs (Manage Sites, Manage Devices or Reporting)
Manage Sites (URLs and keywords)
Follow these steps to set access restrictions via URLs and keywords.
- Click on the Manage Sites tab
- Select Enable
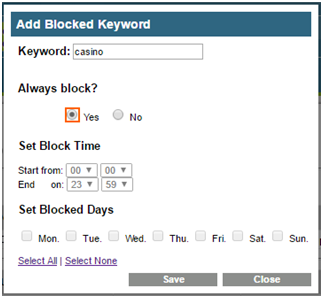
- Click on the Add button next to URL or Keywords row v

- Enter the URL or Keyword to block
- Select if you want to block access at all times or during a specific time frame
- If you select a specific time frame, select the applicable days and time range
- Click Save
- Verify your rules listed on the general Manage Sites tab
Reminders:
- The start time is required to be smaller than the end time. The same URL or keyword cannot be set twice
- Example: You can't block the keyword "Casino" from 0900-13:00 and 1800-2359. If you wanted to cover both of these ranges you would need to block 0900-2359.
- Due to this rule, there is no option to set the rule between days/overnight
- Example: Monday 2200 to Tuesday 0600.
- You can set one of the currently connected devices as a Trusted Device. The rules will apply to all devices except those that were defined as Trusted Devices.
- You can edit rules after they've been created.
Managing Device access
To manage the devices that connect to your WiFi network.
- Select Manage Devices tab
- Select Enable
- Choose Access Type
- Allow All: Blocks only devices which are listed in Blocked Devices list, if any
- Block All: Blocks all devices all of the time, except devices which are listed in Allowed Devices list, if any.
- Note: The blocking function applies only on WAN connection. LAN will still be available for all connected clients, regardless if they were defined in rules or not
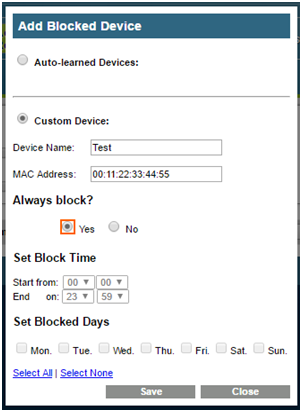
- Click the Add button in Allowed Devices / Blocked Devices row
- Set the name and MAC address of the device
- Select if you want to block access at all times or during a specific time frame
- If you select a specific time frame, select the applicable days and time range
 |
 |
| Without Auto-learned Devices selected, you will need to manually enter a name and MAC address for the device you want to set blocks for. |
With Auto-learned Devices selected, it will populate devices connected to your network automatically. |
- Click Save
- Verify your rules listed in the general Manage Devices tab
Reminders:
- The start time is required to be smaller than the end time. The same device cannot be set twice
- Example: You can't block the device/MAC ID from 0900-13:00 and 1800-2359. If you wanted to cover both of these ranges you would need to block 0900-2359.
- Due to this rule, there is no option to set the rule between days/overnight
- Example: Monday 2200 to Tuesday 0600.
- You can use the Auto-learned devices option to automatically detect devices on your network to set blocks for them without having to find their MAC address manually.
- You can edit rules after they've been created
Reporting
To access Parental Controls reporting information:
- Select Reports tab
- Choose the Report Type
- Options include: All / Managed Sites / Managed Services / Managed Devices
- Select the Time Frame
- Options include: Today / Yesterday / Last Week / Last Month / Last 90 Days

- Click on Generate Report
- Once generated, you can print or download the report by using the corresponding buttons