 Learn how to set up your Shaw email on your Google Pixel smartphone. There are three options for setting up your Shaw email account on your Android device — POP/SMTP, ActiveSync (Exchange) and IMAP. This guide will explain how to connect your Google Pixel to WiFi and explains how to setup your Shaw email account through an IMAP server.
For more information on the differences between IMAP and POP, please see the following article: POP and IMAP email server settings.
Note:
While we have provided the following support information, we want to ensure that our customers receive the best possible support for their third-party hardware and software by speaking with the experts. The best way to resolve your third-party issue is to use support resources from the original manufacturer or developer. If the following information does not answer your question, please visit Google Pixel Support.
IMAP email setup |
|---|
 Follow the steps below to configure your Google Pixel to send and receive emails using an IMAP. Follow the steps below to configure your Google Pixel to send and receive emails using an IMAP.
- Open your phone Settings
- Select Accounts
- Select Add Account
- Choose Personal (IMAP)
- Add your Shaw Email Address
- Select Next
- Enter your Shaw Email Password
- Select Next
- Confirm your Account Options
- Select Next
Manual Settings If your Google Pixel setup did not automatically detect the Shaw email servers, use the following information to complete your setup. Incoming Mail Server Host Name: imap.shaw.ca Username: Your email address without @shaw.ca Password: Your Shaw email password Outgoing Mail Server Host Name: mail.shaw.ca Username: Your email address without @shaw.ca Password: Your Shaw email password |
Related: Alternative POP and IMAP Settings |
Did You Know?
IMAP is the most convenient way to setup your email and is recommended as it is the best option for users looking to check mail worldwide and from different computers/devices.
Learn More: What email setup is right for me?
Back to top
WiFi setup |
|---|
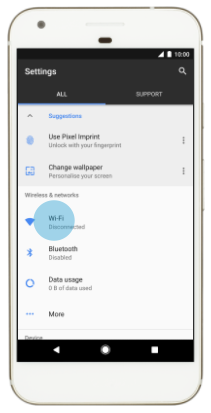
To connect your Google pixel to your wireless (WiFi) network, follow these steps: - Select the Settings from the Apps screen on your phone
- Select Wi-Fi
- Under Wi-Fi, turn Wi-Fi on by sliding the option to on

- Select Wi-Fi (turn on Wi-Fi). Your device will let you know that WiFi networks are available
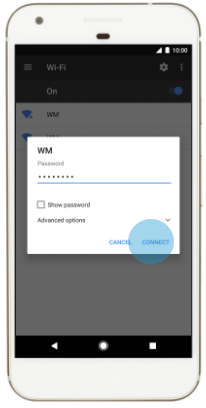
- Tap on the network that you would like to connect to from the available list, then press Join
- If you are using a Shaw Wireless Modem you will be able to find your network name by looking at the white sticker on the top of the modem*
- Enter the network password (unless the network is open and requires no password)
- If you are using a Shaw Wireless Modem you will be able to find your network password by looking at the white sticker on the top of the modem*
- Press Join

|
Related: How to connect to a Shaw Go WiFi Hotspot |
Did You Know?
* If you have customized your network name (SSID) and/or password and can no longer remember the login credentials, you will need to restore it to factory settings.
Learn More: Restore your wireless modem to the default settings
Back to top
Common issues |
|---|
Here are some common issues you may experience when trying to set up your Shaw email on your Google Pixel. Security Requirements for Mobile Access: If after setting up your email client you find that you are still unable to send or receive emails from your phone, please ensure that your password meets the minimum security requirements required for mobile access. If your password does not meet these requirements then mail setup will not work. In some situations, your password will work on other devices in the household but may still fail on your smartphone/tablet because of the additional restrictions required to use Shaw Webmail on your mobile device.
In this case, you may have to change your password to meet the security requirements (seen below) and then update this password in any other household devices and programs where it may be saved (for example Mac Mail, Outlook, Windows Live Mail, smartphone, tablet). Once updated you can proceed to set up your email client again with your new password. Mobile Access Security Requirements - a minimum of 6 characters
- at least 1 upper-case letter
- at least 1 lower-case letter
- a special character (e.g. ~!@#$%^&*() )
- a number
- all of the above requirements must be met within the first 8 characters of the password
SMTP Server is not working If you are still unable to send emails, check to see if your SMTP Server is not configured correctly. - Open Settings and select Accounts & Passwords
- Select your Shaw Email Account
- Select Account under IMAP
- Select SMTP under Outgoing Mail Server
- Select ON under Primary Server
- Ensure that Use SSL is OFF
- Select Authentication
- Ensure that Password is selected and click Back
- Select Server Port and set it to 25
- Select Done
|
Related: How to update/change your Shaw Webmail password |
Back to top
Related Articles

![]() Learn how to set up your Shaw email on your Google Pixel smartphone. There are three options for setting up your Shaw email account on your Android device — POP/SMTP, ActiveSync (Exchange) and IMAP. This guide will explain how to connect your Google Pixel to WiFi and explains how to setup your Shaw email account through an IMAP server.
Learn how to set up your Shaw email on your Google Pixel smartphone. There are three options for setting up your Shaw email account on your Android device — POP/SMTP, ActiveSync (Exchange) and IMAP. This guide will explain how to connect your Google Pixel to WiFi and explains how to setup your Shaw email account through an IMAP server.


